Cinematic Lighting Breakdown for Music Videos
cinematic lighting tutorial
cinematic music video lighting
Filmmaking
lighting
Lighting Tips
Tips & Advice
Videography
GearFocus
May 26, 2020

Today we're taking a look at a cinematic lighting breakdown for music videos. With such a subjective topic, there are obviously tons of ways to achieve the different looks and feels for your videos. So take these suggestions as just that - and alter them to fit your needs for your next music video!

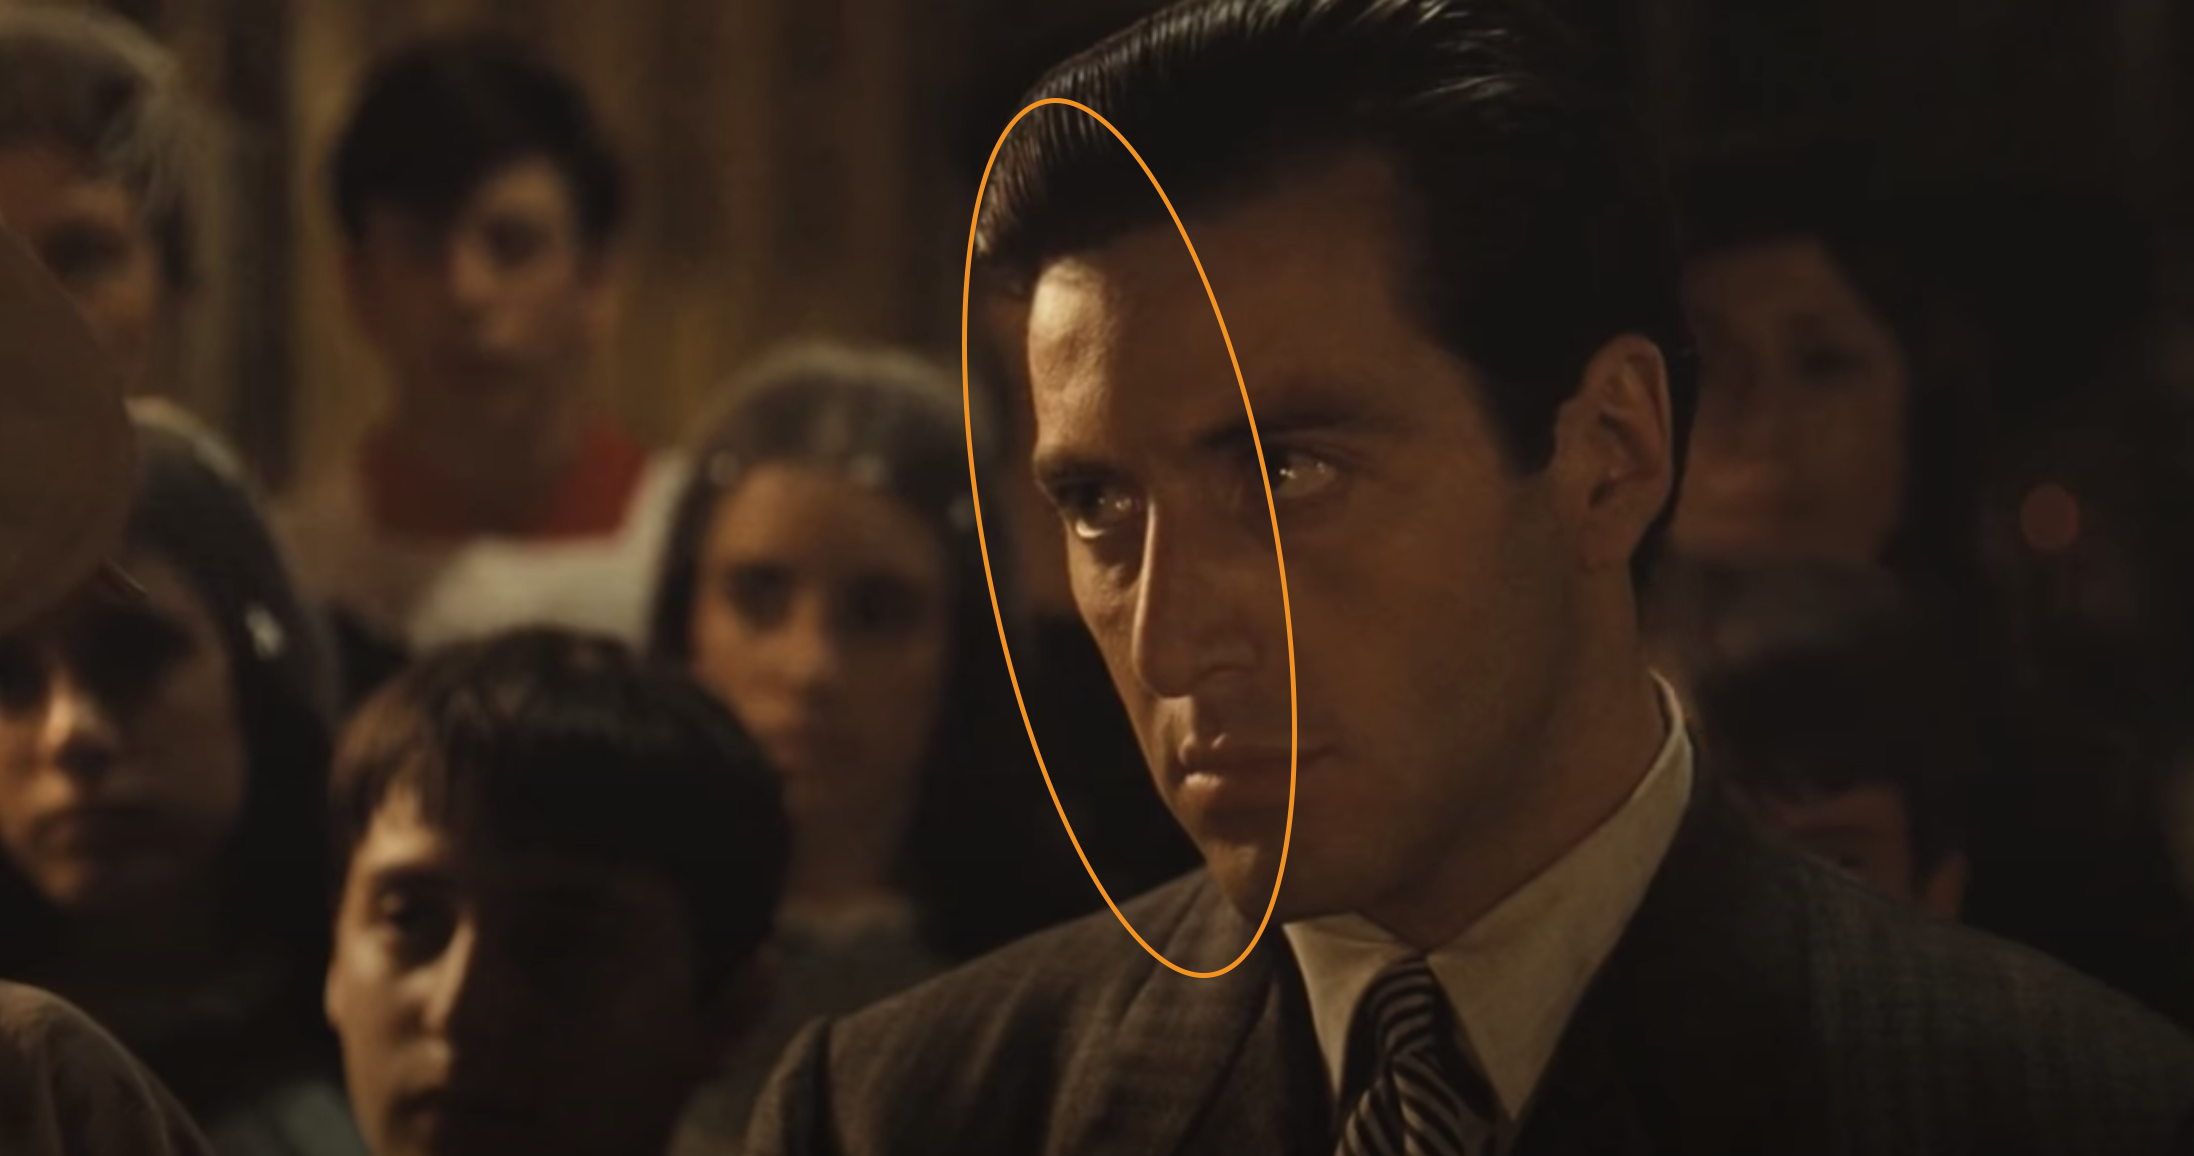
 In our example above, the key light is placed on the left side of Al Pacino's face. As he has turned to his right, the key light becomes a sliver of concentrated light. This cinematic lighting breakdown reveals the darkness in his character taking over more of himself.
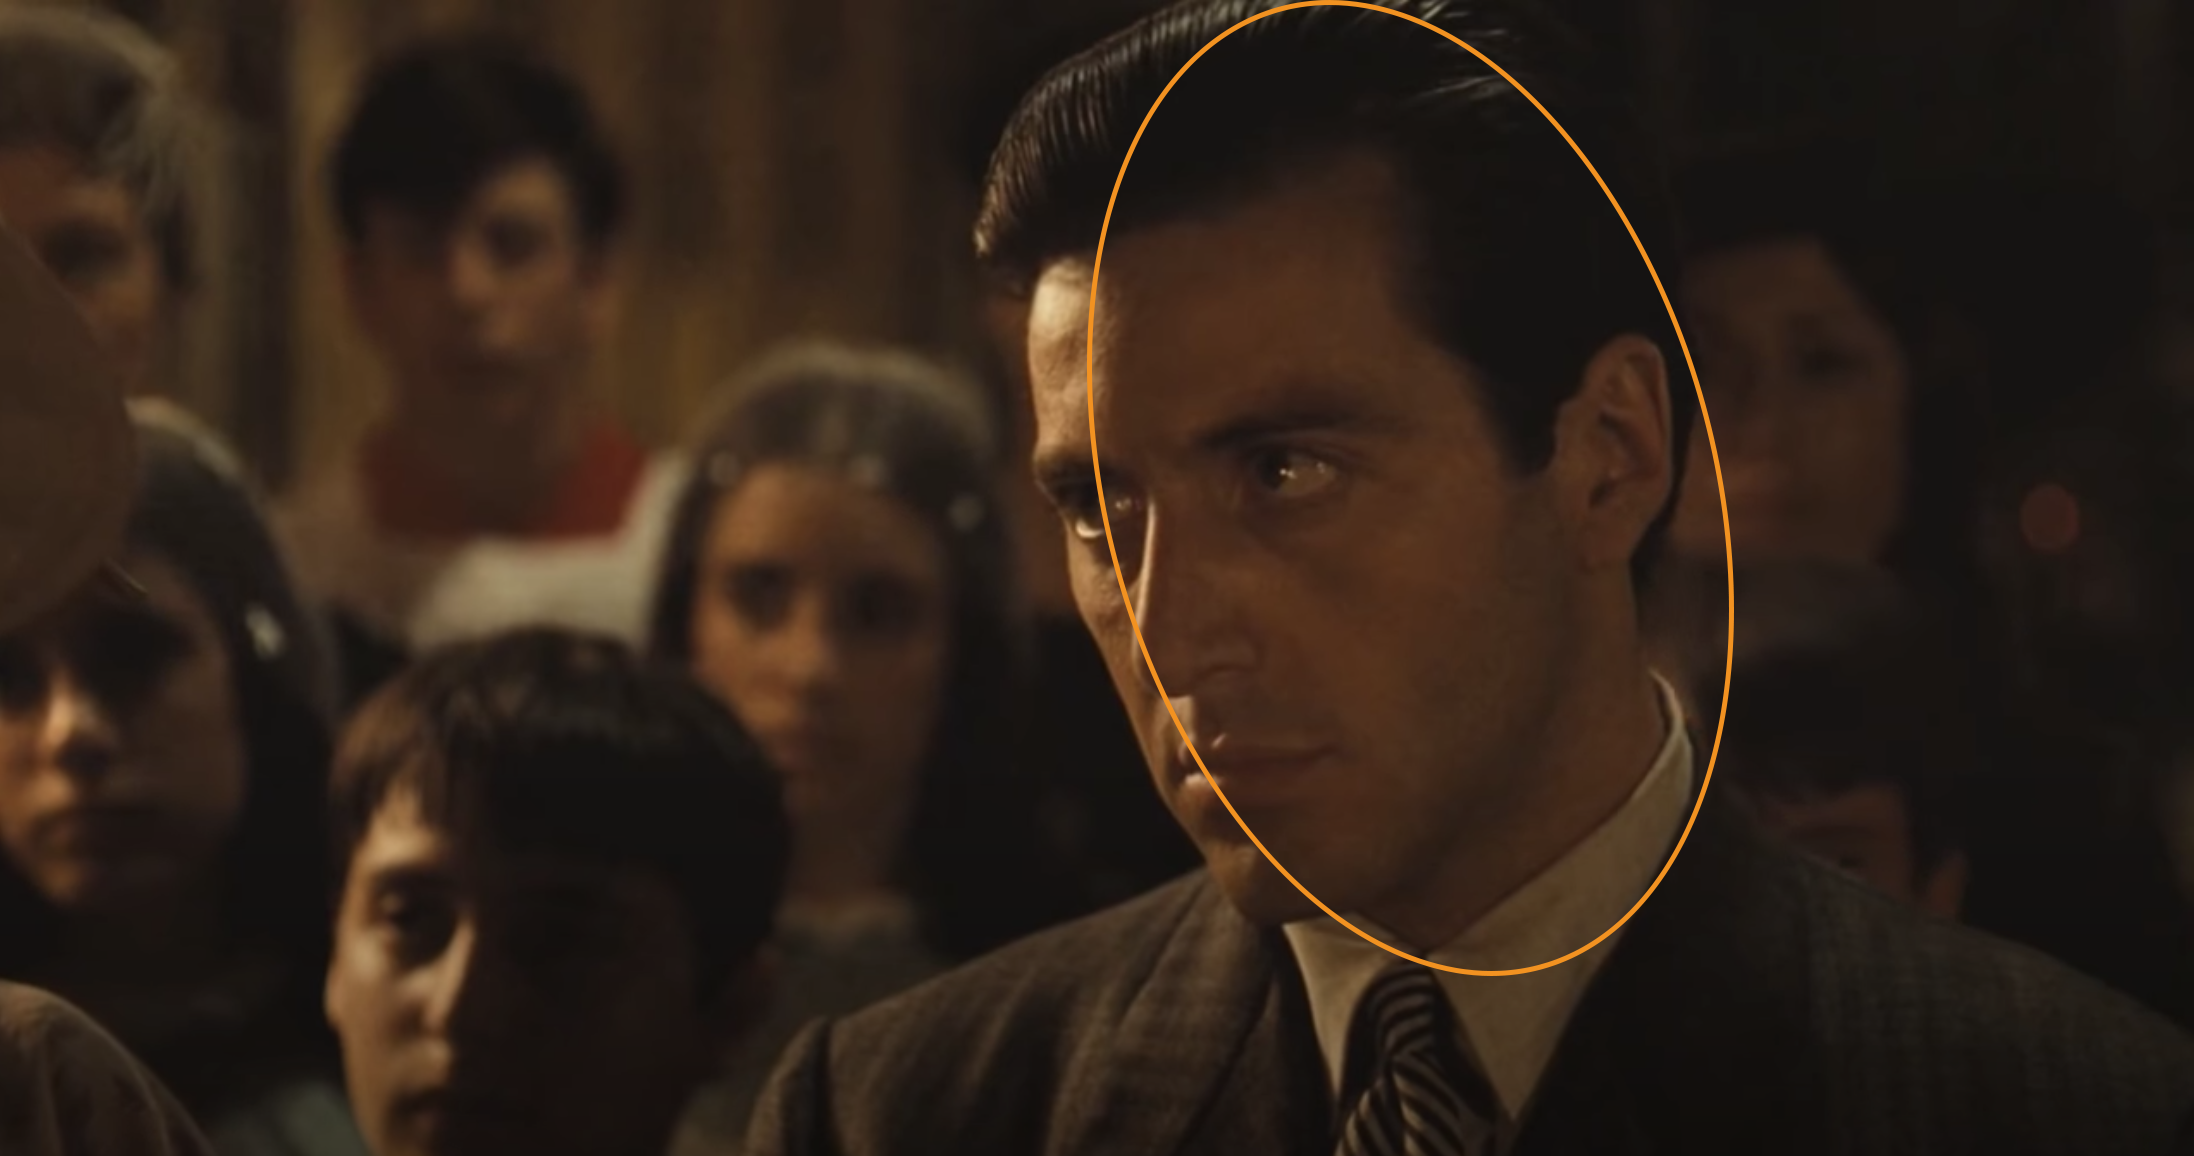
 In our example, the main fill light is used to brighten the broad side of Al Pacino's face. When done correctly, it won't seem like there's a light being used at all: you hardly notice it. If you look in the background there is an altar boy that is prominently lit from the right of the scene. This is another fill light being used to bring out some of the detail of the background. The other extras are lit from the left side of the screen - probably the same key light used on the subject.
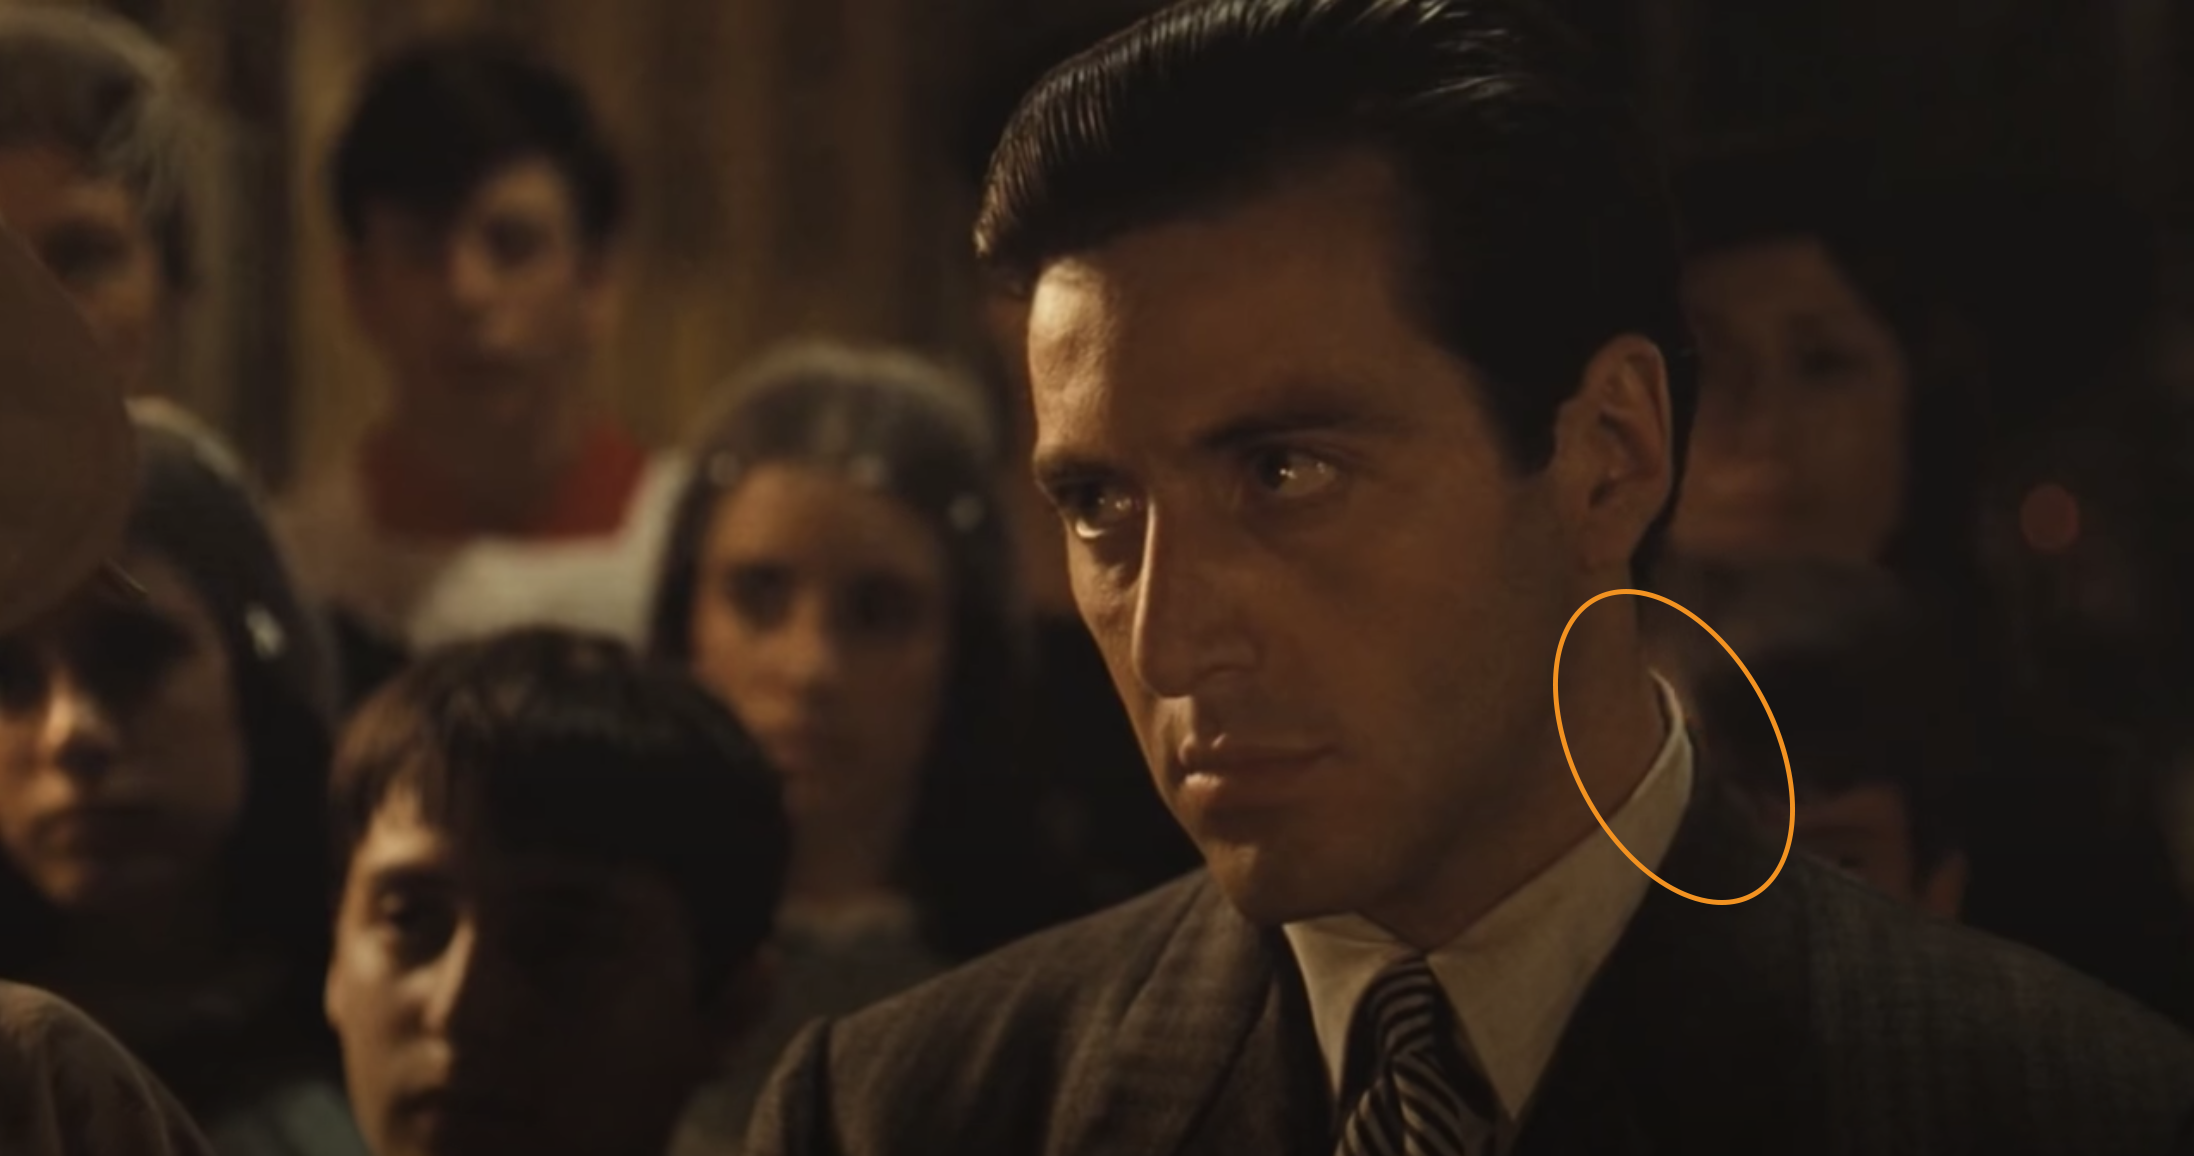
 In this example, the collar of Al Pacino's shirt is the most prominently lit with a back light. The ride side of the screen is dark, and this light is used to separate the subject from the background. This scene is inviting us to look toward the left of the screen in the same way as Al Pacino's character.
 This shot, for example, was actually shot using only the natural light coming in from the huge windows in the background. There are tons of ways to use the natural light at your disposal for a more cinematic vibe. You can see for yourself all the inventive ways that Lee uses to light his shoots. And best of all he also offers a lot of extra information on how he got certain shots and what gear choices he used to achieve them.
https://youtu.be/vYj7AkwCEeU?list=PLjyCoUBxH7MX_-ZRySkWtBBubAe2ZM5E2
 And you can also check out Lee's gear shop on Gear Focus. If you have any other questions on the cinematic lighting breakdown or techniques, let us know in the comments below. Or you can always contact us and let us know what kind of content you want to see next! And also be sure to check out these other lighting techniques.
Cinematic Lighting Breakdown for Music Videos
https://www.youtube.com/playlist?list=PLjyCoUBxH7MX_-ZRySkWtBBubAe2ZM5E2 In this video our friend Lee Zavitz does a cinematic lighting breakdown showing exactly how he went about lighting this music video. There are a lot of great behind-the-scenes details, but specifically Lee reveals how he lights a music video. There is a lot of awesome step-by-step information on which lights he used, and specifically how he went about placing the lighting. Lee also discusses why he made certain lighting choices throughout the video.Three-Point Cinematic Lighting Basic Setup
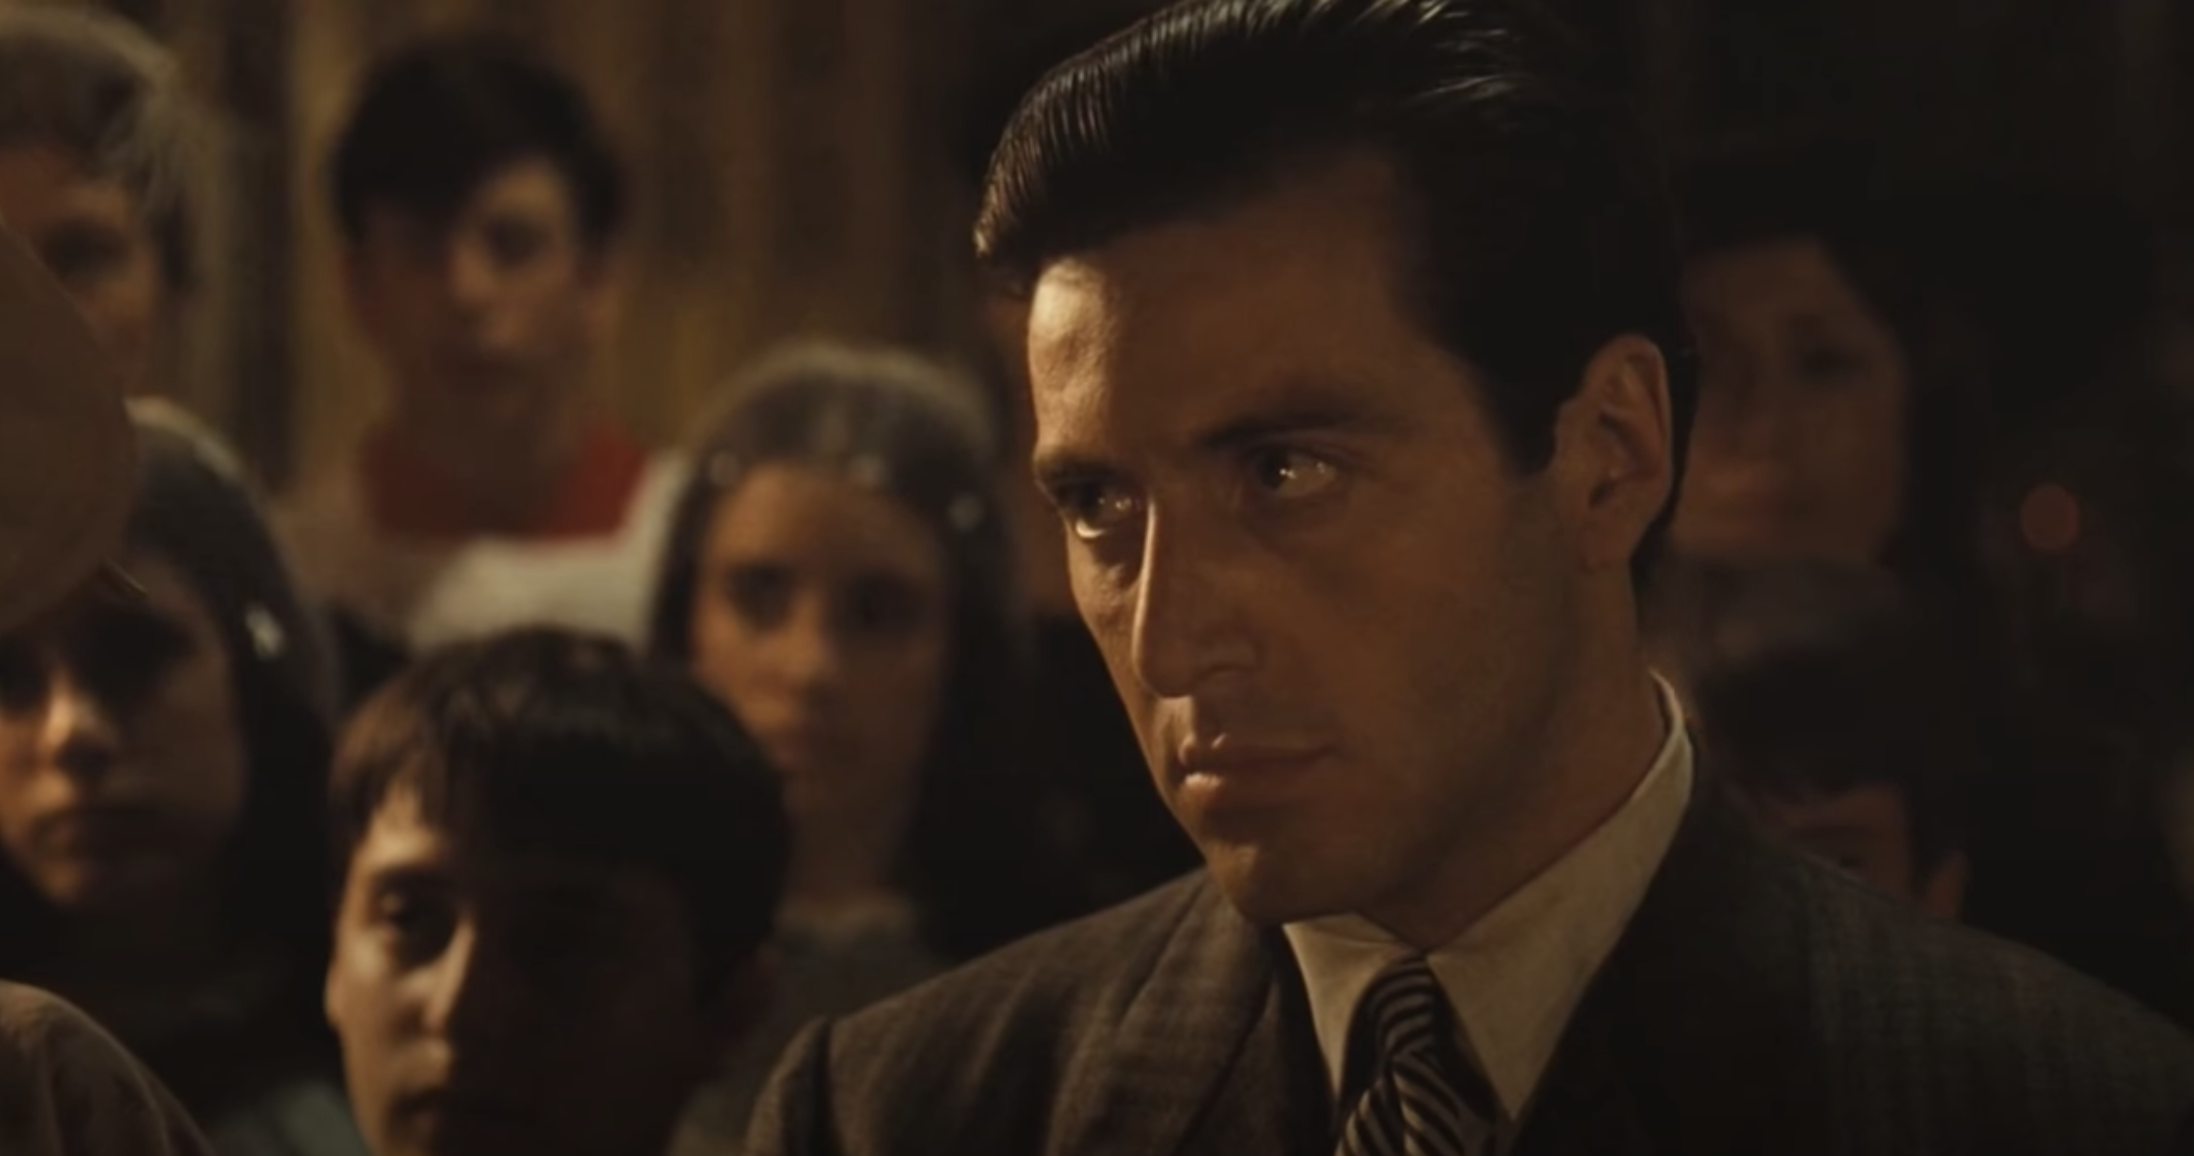
Before we dive more into Lee's cinematic lighting breakdown, let's start with some of the basics. You've probably heard of the basic lighting setup that has been used forever: three-point lighting. But we just wanted to offer a quick overview/refresher. Three-point lighting is generally considered the standard setup for lighting a scene in most instances. The three points of light are the key light, the fill light, and the back light. Let's take a look at this example from one of the best movies of all time: The Godfather.
Key Light
The key light is your main source of light in a scene. This is the light that features most prominently on your subject. Generally, you'll want to place the key light slightly off to one side in front of your subject. Avoid placing directly in front of the subject - unless of course it is for dramatic purpose. In our example above, the key light is placed on the left side of Al Pacino's face. As he has turned to his right, the key light becomes a sliver of concentrated light. This cinematic lighting breakdown reveals the darkness in his character taking over more of himself.
Fill Lights
Fill lights are exactly that - they fill in shadows and dark spots in your frame. They are used on the subject, but they can also be placed throughout the scene to brighten any dark areas or draw attention to other places on screen. Since your key light will be slightly off to the side, you can use a fill light to brighten up the other side of the subject. This way your subject wont have any harsh shadows caused by the key light. Adjusting the fill lights is one of the easiest ways to achieve a cinematic lighting look. In our example, the main fill light is used to brighten the broad side of Al Pacino's face. When done correctly, it won't seem like there's a light being used at all: you hardly notice it. If you look in the background there is an altar boy that is prominently lit from the right of the scene. This is another fill light being used to bring out some of the detail of the background. The other extras are lit from the left side of the screen - probably the same key light used on the subject.
Back Lights
Your back light is used to create separation from the background of your scene. Place the back light behind the subject so as to create an "outline" effect around them. This way, they will pop out more and draw the eye. The back light also reduces harsh shadows caused by the key and fill lights. In this example, the collar of Al Pacino's shirt is the most prominently lit with a back light. The ride side of the screen is dark, and this light is used to separate the subject from the background. This scene is inviting us to look toward the left of the screen in the same way as Al Pacino's character.
Alter the Basics for Dramatic Effect
So those are the basics of a cinematic lighting breakdown for video. How do you apply these for dramatic effect? Well, the answer depends entirely on the situation as well as the cinematographer. Lighting is an artistic endeavor, so there is no right or wrong: it is up to each artist to arrange the lights to achieve the look they want. You'll most likely want to start with these basics and then adjust them to fit your needs. The great thing is that there is an infinite number of ways to change the looks of your shots! So now that we have the basics, let's take a dive into Lee's tips for great cinematic lighting in music videos.Cinematic Lighting Breakdown & Tips
First off, it's important to know what emotions you are trying to evoke with your lighting choices. It's super important to plan, plan, plan ALL your shots! Have detailed ideas of what story you are telling with your music video. Once you know the script and shooting locations, you'll have a better idea of how you'll want to go about lighting everything. From Lee's video above, we can see that using practical lights can still give you great cinematic lighting in your videos. Especially if you don't have a big budget, just use what you've got strategically and you can achieve some pretty great results. Lee even mentions using garbage bags to flag off some of the light spill!Part 2 of the Series
In Part 2 of Lee's series of cinematic lighting breakdown for music videos, he reveals how he used just ONE light to light a video. So you can still achieve great results even with limited supplies. The video in question was a lower budget production. But the quality still shines through when you realize how much they were able to achieve with just one light. This shot, for example, was actually shot using only the natural light coming in from the huge windows in the background. There are tons of ways to use the natural light at your disposal for a more cinematic vibe. You can see for yourself all the inventive ways that Lee uses to light his shoots. And best of all he also offers a lot of extra information on how he got certain shots and what gear choices he used to achieve them.
https://youtu.be/vYj7AkwCEeU?list=PLjyCoUBxH7MX_-ZRySkWtBBubAe2ZM5E2
Part 3: Lighting a HipHop Music Video
https://youtu.be/l_0Ezo2UO7Q In part three of Lee's series he breaks down how he goes about lighting a hip hop music video. Lee shows a detailed look at how he used colored light tubes for cool effects on the performers. He also used pixel tubes in one scene as a way to hide the background! This is one of many resourceful ways in which you can use light not just to brighten areas, but also to hide areas on screen.Tell Us How You're Lighting Your Next Shoot
Special thanks to Lee Zavitz for putting these awesome videos together! Be sure to check out his other videos and subscribe to his channel if you haven't already! And you can also check out Lee's gear shop on Gear Focus. If you have any other questions on the cinematic lighting breakdown or techniques, let us know in the comments below. Or you can always contact us and let us know what kind of content you want to see next! And also be sure to check out these other lighting techniques.
Own one like this?
Make room for new gear in minutes.
Loading...