10 TIPS to EDIT FASTER in Premiere Pro
adobe editing
editing tips
faster editing workflow
Gear Focus Friday
premiere pro
premiere tips
speed up your editing
Tips & Advice
Tutorials
GearFocus
Apr 10, 2020
Happy Friday! This week we are taking a look at some tips everyone should be using in order to edit FASTER in Adobe Premiere Pro. Take a look at our ten tips, and be sure to let us know YOUR tips for speeding up your edits in Premiere Pro.
https://youtu.be/Nh4WWqas6kY

 From here you simply select "Audio" and click "OK." This will take a moment and then automatically line your audio for you! Super easy way to align your clips with just a couple clicks that can definitely save you a bunch of time and help you edit faster.
 Then rename it to "Favorites" and you will have a custom bin in your effects panel every time you open it up. When you find yourself using a certain effect or plugin repeatedly, just drop it into your favorites folder. Having these heavy rotation effects all in one place is a surefire way to improve your Premiere Pro workflow.

 Look for a little red line on the effects icon on top of the clip in your timeline to be sure that a master clip has been edited.
10 Tips to Help You Edit Faster in Premiere Pro
We've got some new editing tricks to help you speed up your editing workflow! These tips can be used to help you edit faster. Some of these are probably not new to you, but if you remember to use these when editing, you'll be sure to speed up your workflow. The more you practice with these tips, the faster and more efficient an editor you will be. So let's dive right into our tips.Tip #1 Keyboard Shortcuts
These shortcuts are the best way to navigate efficiently around your timeline and switch between tools. Any serious editor out there knows keyboard shortcuts are the only way to edit, and we all probably have our favorites permanently etched in our brains. Some of our favorite standard shortcuts are "V" Select tool, "C" Cut tool, "B" Ripple Edit. Another big one is the "P" Point tool. This tool can be used to add custom fades to video and audio tracks. The "A" Select All too can be useful for highlighting everything to the right of your cursor on your timeline. This way, you can move everything down just a bit, or close a gap without having to worry about any other edits further down the timeline. Or use "Shift + A" and you highlight everything to the left of your cursor. "+" and "-" on the keyboard making zooming in and out on the timeline a snap. Another favorite is using "Option" ("Alt" on PC) and dragging a clip to quickly duplicate that clip.Tip #2 Edit Faster in Premiere Pro with Ripple Delete
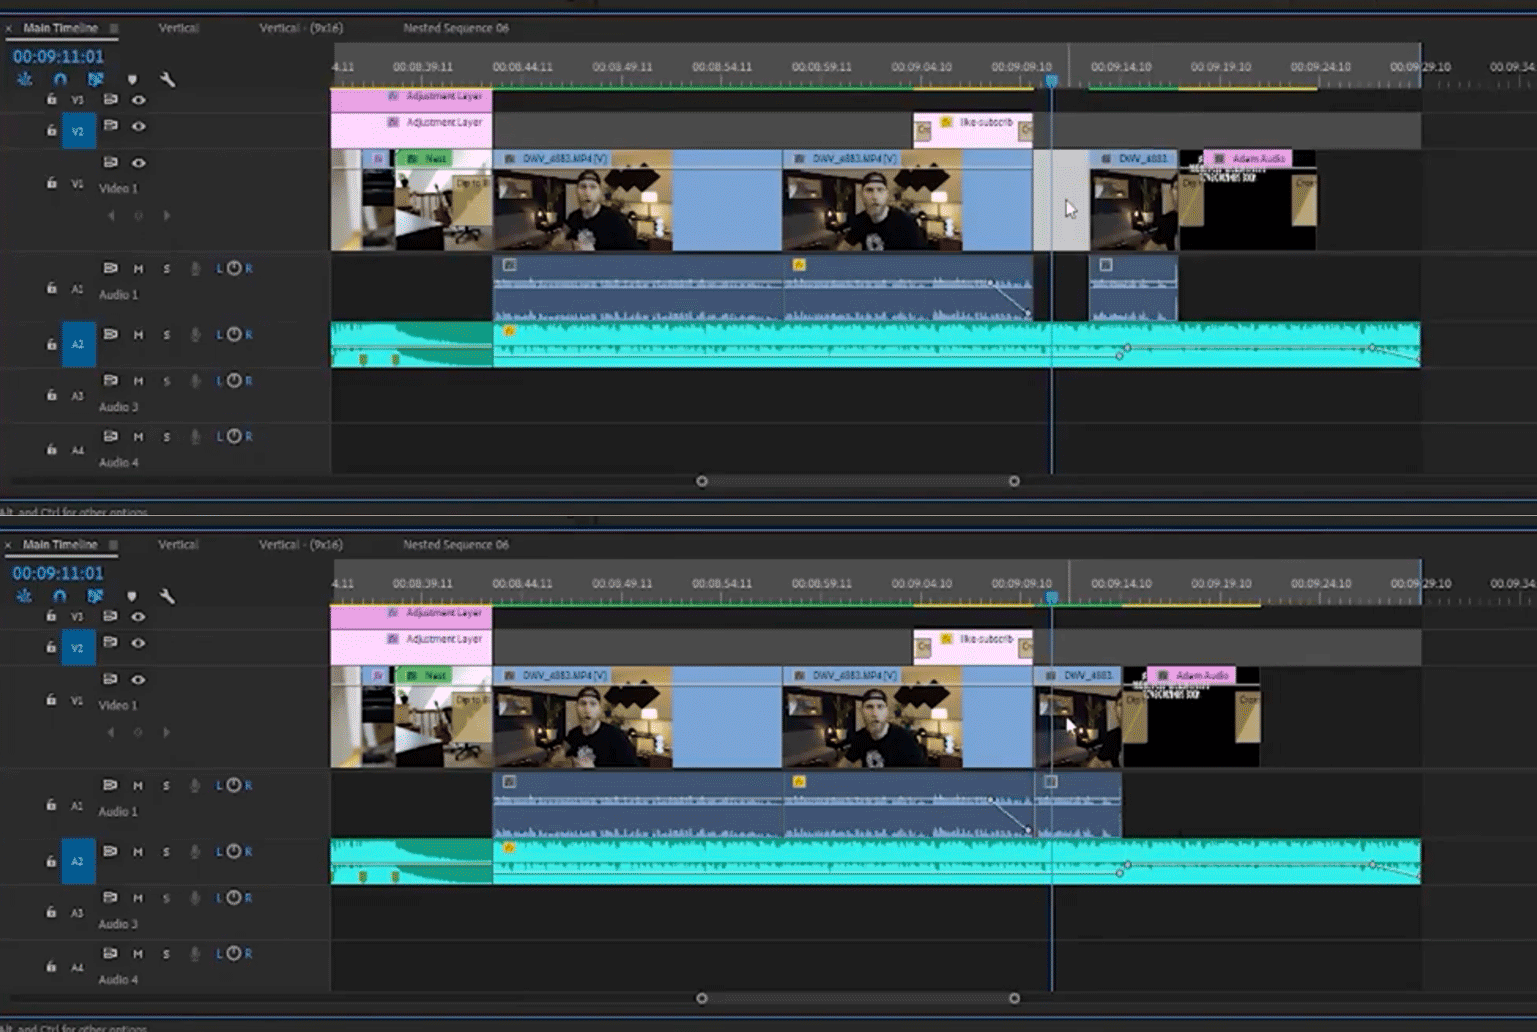
Similar to a keyboard shortcut tip, this is a way to quickly remove a gap in your timeline. This can really come in handy when you've finished laying out your initial video tracks and need to go back and make edits. No more dragging and dropping your clips to eliminate the gaps! The ripple delete tool helps you to edit faster.
Tip #3: Moving Clips Up & Down on the Timeline
So say you want to add an adjustment layer or an effect to your timeline. All you have to do is highlight the clip(s) you want to move, hold down "Option" ("Alt" for PC) and click the up or down arrows. This will keep the clip exactly where it is in time just up a track or down a track. One thing to note: if you move it over an existing clip, it WILL overwrite that clip. So just be careful when moving your clips.Tip #4: Export with Media Encoder
When your edit is done, hit "CMD + M" ("CTRL + M" on PC) to bring up your export settings. Now the tip here is to hit "queue" instead of simply exporting. Now you can hit the play button at the top and it will start rendering your selected sequence. This allows you to go back into Premiere and continue editing.Tip#5: Optimize Settings to Edit Faster in Premiere Pro
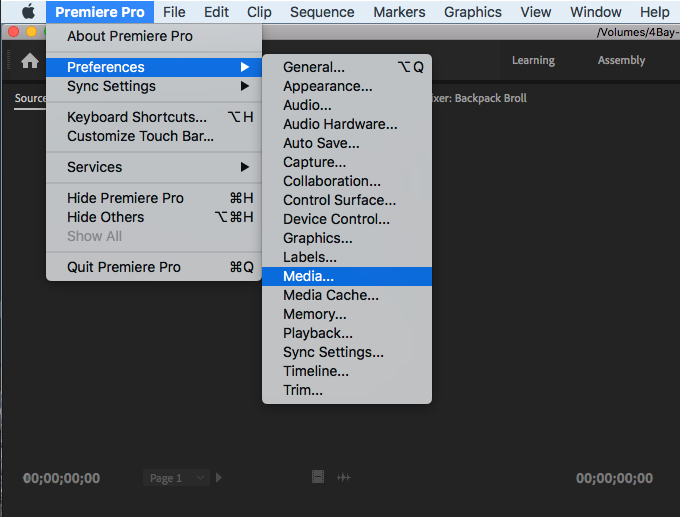
Under Premiere Pro > Preferences > Media (Edit > Preferences > General on PC, then head to the Media tab.) Here you can turn OFF the "Automatically refresh growing files" setting. This one setting can speed up your Premiere workflow so much! This really helps to speed up your system and helps Premiere to run so much faster.

Tip #6: Audio Sync
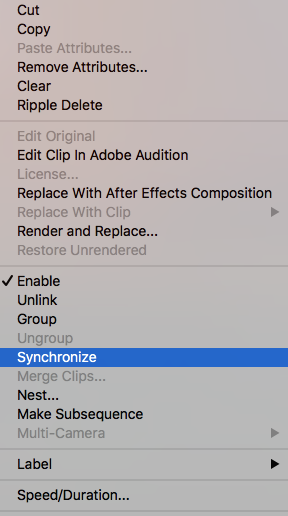
This is a recent addition to Premiere Pro and one that we're very excited about! Previously we had been using the Red Giant Pluraleyes plugin to achieve these results. Add your clips to the timeline and start by highlighting everything that you want to synchronize. Next you'll right click on those clips and select "synchronize." From here you simply select "Audio" and click "OK." This will take a moment and then automatically line your audio for you! Super easy way to align your clips with just a couple clicks that can definitely save you a bunch of time and help you edit faster.
Tip #7: File Organization
We like to set up our folders all in the same structure. What we do is create a folder and then within that folder we create separate folders for audio, graphics, outputs, project files, and video. Within the video folder you can even further separate based on camera, b-roll, etc. In the outputs we have a "draft" and a "master" folder for each type of output. Then when you have the folders laid out how you like, you compress them into a zip file. Now you have a project folder template set up that will let you organize each project in exactly the same way. Knowing where everything is will help you speed up your workflow immeasurably over time.Tip #8: Effects Favorites to Edit in Premiere Pro
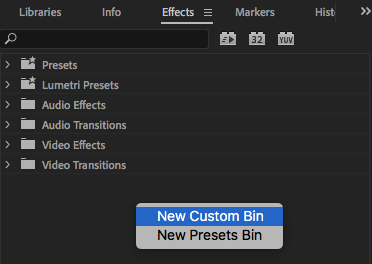
Under your effects panel you can create a custom bin. Navigate to the effects panel and right click to select "New Custom Bin." Then rename it to "Favorites" and you will have a custom bin in your effects panel every time you open it up. When you find yourself using a certain effect or plugin repeatedly, just drop it into your favorites folder. Having these heavy rotation effects all in one place is a surefire way to improve your Premiere Pro workflow.
Tip #9: Insert a Clip
Instead of dragging a clip directly down to your timeline, you can pull it over to the Program Monitor and get a variety of options.- Insert
- Insert before or after
- Overlay
- Replace
- Overwrite
Tip #10: Fine Audio Adjust
And our final tip to help you edit faster is shortcuts to help you raise or lower your audio. You can fine tune things at one decibel at a time. No more dragging a little line up and down trying to get things just right. All you have to do is use the bracket keys "[" and "]" to adjust the audio one decibel higher or lower. This keeps it simple so you can just click the brackets and you don't have to expand your audio tracks and try to gauge the right amount higher or lower. And almost always go way too high of way too low if you you're anything like me.BONUS TIP #11 to Edit Faster: Master Clip Editing
This works great when you are trying to color grade a bunch of clips from the same master file. For example if you have a long interview that you need to chop up, you can edit the master clip. In Premiere, head over to your Lumetri color panel and click on the "Master 'file name.'" Now when you make adjustments, it will color grade all clips from that master file.
What Are Your Shortcuts for Editing Faster?
We'd love to know which shortcuts you use to speed up your Premiere Pro editing. Are there any other shortcuts we've missed that drastically improve your Premiere Pro workflow? Or are there any shortcuts you use that are better or faster than the ones we've mentioned? We are always looking for ways to improve, so be sure to share your tips in the comments below! Also, don't forget to use these short cuts when entering into our "Focus on the Good" short film contest!Own one like this?
Make room for new gear in minutes.
Loading...
© 2024 GearFocus. All rights reserved.